VulCAN USB-CANbus Adapter
Product ID: Cu//AC41
Note
See also the shop page for this product: link
Overview
CANbus is everywhere these days! Robots, cars, sensors, drones, anything that can benefit from medium-speed, ultra-rugged, networked communication is better with CAN. Unfortunately, it’s really only microcontrollers that have built-in support for talking the language of CAN. That’s where VulCAN comes in — it’s a simple, straightforward, and reliable way to network anything from your laptop to a Raspberry Pi with existing CAN hardware. Really, it’ll work with anything with a USB port - whether Linux, MacOS, or Windows!
What’s more, it’s fully open source - hardware and software.
Pick up a VulCAN today, and get going with CAN in no time!
Key Features
VulCAN supports CAN 2.0A and CAN 2.0B
Baudrates up to 1Mbit/s
Can connect over either slcan (Windows, Linux, MacOS), or enumerate as a native SocketCAN device (Linux only)
Both 0.1” pin headers and screw terminals for easy, reliable wiring
Built-in 120 ohm termination resistor, selectable via switch
Breakaway mounting holes for easy project integration
USB-C port for easy connection
Paranoid levels of ESD protection on USB and CAN lines
Knowing your VulCAN
Congrats on purchasing your VulCAN! Or, if you haven’t yet, thanks for checking out these docs ;)
A quick tour:
At its base, a VulCAN is a USB port on one side, CAN on the other side, and not too much of note in the middle. So when in doubt, those are the parts that matter!
Breakaway mounting holes are provided - this gives a nice 31.75mm x 25.4mm M3 (aka 1.25in x 1in #6) mounting pattern for integrating a VulCAN into your projects. Or, if you’re space constrained (or want a bunch to fit in your pocket), just snap the mounting holes off!
The USB-C port will work fine with both A-C and C-C cables. It’s only USB 2.0 FS, and will expect at least ~100mA available from the USB port.
On the right side of the board, there’s both a screw terminal and a 0.1” pin header. These are electrically identical, and the signals are routed to both. Both are provided just in case one is easier than the other. We recommend the screw terminal, or desoldering either terminal and soldering wires directly to the board, in any sort of rugged or high-vibration environments (or contact us for a custom solution).
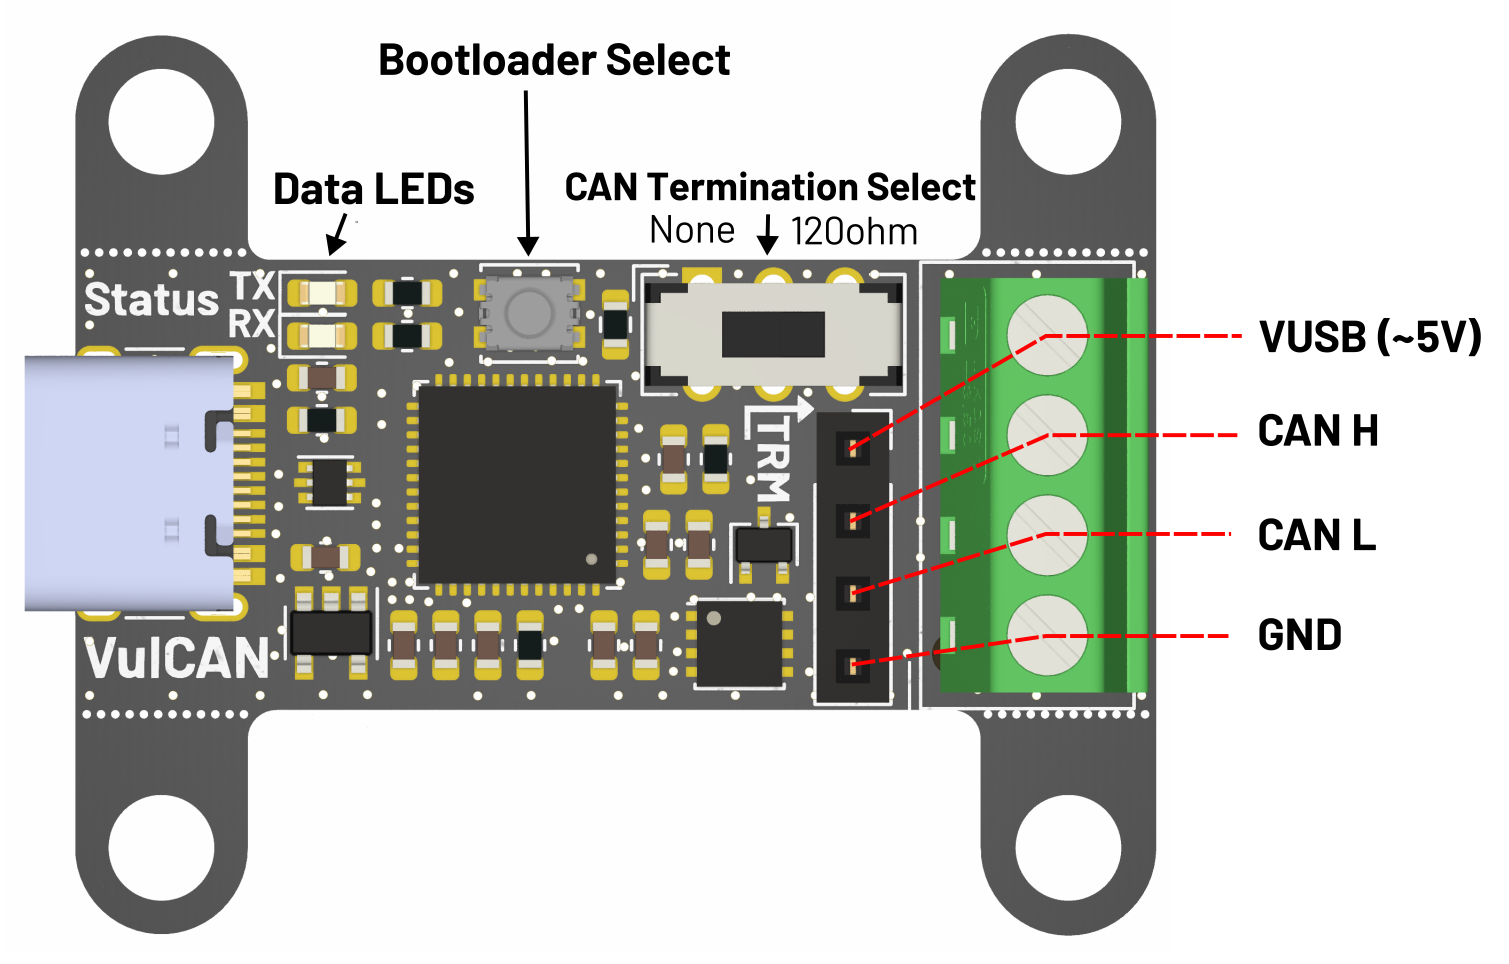
- On the top of the board are the data LEDs, bootloader button, and CAN select switch
The data LEDs just tell you what the VulCAN’s doing - TX flashes whenever sending data, RX flashes whenever receiving data. Nice and easy for debugging, or just staring at the pretty blinkenlights.
The bootloader select button is currently used only for firmware upgrades. By holding the button down when plugging the device in, the device will start in USB DFU (firmware upgrade) mode. See the “Flashing Firmware” section for more info.
The CAN termination select switch enables or disables a 120Ω resistor across CANH/CANL - you need exactly two of them, one on either side of your bus. Doesn’t have to come from a VulCAN though - having one onboard is just to make your life easier ;)
Wiring Guide
VulCAN wiring is fairly straightforward. Fundamentally, all you need is to connect your VulCAN’s GND, CANH, and CANL to the bus.
All USB and CAN pins are fully ESD protected to IEC 61000-4-2 level 4.
Some other notes:
Make sure the VulCAN and all your CAN devices are on a common ground.
The VulCAN does not isolate USB ground and CAN ground. This is typically not an issue. However, if you are using the VulCAN in an environment with extremely large transient currents, life-threatening voltages, or both, please use a USB isolator module to break any ground loop and ensure safety.
The VulCAN provides a raw VUSB output from the USB supply - this will be in the 4.5-5.5V range. It’s unregulated and unprotected, so please ensure load current stays below the maximum supply current of your USB port - this is usually 100-500mA. It’s not necessary to ever connect VUSB for proper VulCAN functionality - the VUSB output is simply provided so that you can power other devices from the VulCAN - i.e., a microcontroller on a breadboard, or some CAN-based sensor for development.
Flashing Firmware
Your device will come from the factory with the slcan firmware pre-installed. If/when you want to either change the firmware (see the Firmware Options section for more details), or update to a newer version, you will have to flash a new firmware image.
Steps:
Grab your new firmware. This’ll be a .bin file - likely something that looks like “vulcan_firmware_slcan.bin” - as an example.
Put your VulCAN into DFU mode. First, disconnect USB so the device is unpowered. Then, reconnect USB while holding down the bootloader select button on the board. It should enumerate on the host computer as “STM32 Device in Bootloader Mode,” or similar. This can be seen on Windows in the device manager, or in dmesg on Linux.
- Flash the firmware. This can be done using either dfu-util on Linux, or STM32CubeProgrammer on MacOS / Windows.
If using dfu-util, run sudo dfu-util -a 0 –dfuse-address 0x08000000 -D vulcan_fw.bin, replacing vulcan_fw.bin with your actual firmware file.
If using STM32CubeProgrammer, just open the application, select the firmware file, and hit go!
Alternately, you can try using an online USB DFU program, such as https://devanlai.github.io/webdfu/dfu-util/. We haven’t tried this firsthand, but we figured it was worth including.
Disconnect and reconnect your VulCAN. It should re-appear as a normal VulCAN device (not in DFU mode)!
Sending Your First Bytes (And Receiving Them Too!)
Now that you have your VulCAN, let’s learn how to actually send and receive some bytes!
By default, VulCANs come with the slcan firmware. This provides a simplified CAN interface over a USB serial link. It’s not as fast as a native SocketCAN device (as provided with Candlelight firmware), but it’s extremely easy to get going.
We’ll be using the python-can module here, but there’s implementations in just about every language out there - or make your own from the spec!
Sending data
Quick example for sending data - here we’re just shoving some arbitrary bytes onto the bus.
import can

# Replace '/dev/ttyACM0' with the appropriate port for your SLCAN device (COM1, /dev/tty.usbmodem, etc) and set the desired bitrate (10, 20, 50, 100, 125, 250, 500, 800, 1000 kbps)
channel = "/dev/ttyACM0"
bitrate = 500000

# Configure the connection to the VulCAN
bus = can.interface.Bus(channel=channel, bustype="slcan", bitrate=bitrate)

# Define a CAN message with an arbitrary ID and data bytes
message_id = 0x123
data_bytes = [0x11, 0x22, 0x33, 0x44, 0x55, 0x66, 0x77, 0x88]
message = can.Message(arbitration_id=message_id, data=data_bytes, is_extended_id=False)

# Send the CAN message
bus.send(message)
print(f"Sent message: {message}")

# Close the bus connection
bus.shutdown()
Receiving Data
And now we can listen to the bus for a few seconds and see what we receive (if anything)!
import can
import time

# Replace '/dev/ttyACM0' with the appropriate port for your SLCAN device (COM1, /dev/tty.usbmodem, etc) and set the desired bitrate (10, 20, 50, 100, 125, 250, 500, 800, 1000 kbps)
channel = "/dev/ttyACM0"
bitrate = 500000

# Configure the connection to the VulCAN
bus = can.interface.Bus(channel=channel, bustype="slcan", bitrate=bitrate)

# Set a timeout for receiving messages (in seconds)
timeout = 10
end_time = time.time() + timeout

print(f"Listening for CAN messages for {timeout} seconds...")

# Receive CAN messages until timeout is reached
while time.time() < end_time:
    message = bus.recv(timeout=end_time - time.time())
    if message:
        print(f"Received message: {message}")

# Close the bus connection
bus.shutdown()
Ping-Pong
If you happen to have two VulCAN devices, you can connect them together and try sending data between them:
import can
import time

# Replace '/dev/ttyACM0' with the appropriate port for your SLCAN device (COM1, /dev/tty.usbmodem, etc) and set the desired bitrate (10, 20, 50, 100, 125, 250, 500, 800, 1000 kbps)
channel_1 = "/dev/ttyACM0"
channel_2 = "/dev/ttyACM1"
bitrate = 500000
import can
import time

# Configure connections to both VulCANs
vulcan_1 = can.interface.Bus(channel=channel_1, bustype="slcan", bitrate=bitrate)
vulcan_2 = can.interface.Bus(channel=channel_2, bustype="slcan", bitrate=bitrate)

# Define a CAN message with an arbitrary ID and data bytes
message_id = 0x123
data_bytes = [0xDE, 0xAD, 0xBE, 0xEF]

message = can.Message(arbitration_id=message_id, data=data_bytes, is_extended_id=False)

# Send the CAN message from VulCAN 1 to VulCAN 2
vulcan_1.send(message)
print("Vulcan 1 sent message:", message)

# Receive the CAN message on VulCAN 2
received_message_2 = vulcan_2.recv(timeout=1)
if received_message_2:
    print("Vulcan 2 received message:", received_message_2)

# Send the CAN message from VulCAN 2 to VulCAN 1
vulcan_2.send(message)
print("Vulcan 2 sent message:", message)

# Receive the CAN message on VulCAN 1
received_message_1 = vulcan_1.recv(timeout=1)
if received_message_1:
    print("Vulcan 1 received message:", received_message_1)

# Close the bus connections
vulcan_1.shutdown()
vulcan_2.shutdown()
Given successful execution, you should see something like this:
Vulcan 1 sent message: Timestamp: None    ID: 0123    000    DLC:  4    DE AD BE EF
Vulcan 2 received message: Timestamp: TIME1    ID: 0123    000    DLC:  4    DE AD BE EF
Vulcan 2 sent message: Timestamp: None    ID: 0123    000    DLC:  4    DE AD BE EF
Vulcan 1 received message: Timestamp: TIME2    ID: 0123    000    DLC:  4    DE AD BE EF
Setting Up a Native CAN Interface (slcan)
While slcan is just a serial protocol, the Linux can-utils package provides slcand, which will create a “virtual” native CAN interface, and reroute all traffic to/from a slcan link. This means you can have a VulCAN attached, running slcan firmware, and use a native CAN interface in anything that supports it! Please note that this will only work in Linux-based systems.
So how do we do this? Simpler than you may think!
Start the slcand daemon. An example command is below. Replace /dev/ttyACM0 with the correct device name and -s8 with the desired bitrate (10, 20, 50, 100, 125, 250, 500, 750, 1000 Kbps mapping to 0 through 8, respectively):
slcand -o -s8 -t hw -S 3000000 /dev/ttyACM0 can0
Bring the newly created can0 interface online
sudo ip link set up can0
Send some data!
cansend can0 123#DEADBEEF
Receive some data!
candump can0
slcand is great for native applications that expect a built-in CAN interface instead of an external serial device.
Setting Up a Native CAN Interface (candleLight/SocketCAN)
If you’ve flashed your VulCAN with the candleLight firmware, it’ll automatically enumerate as a native CAN interface (i.e. can0, can1, etc).
All you need to do to bring this interface up is run sudo ip link set up can0 baudrate, replacing baudrate with your chosen CAN speed (e.g. 250000 for 250Kbps). Then, you can use the cansend/candump commands for testing, or get right to using your VulCAN in your end application.
Firmware Options
VulCAN is provided with two (user-uploadable) firmware options: slcan and candleLight. Fundamentally, slcan and candleLight are simply two different approaches to interfacing a CAN bus over USB adapters. Let’s go over the details!
slcan
slcan (Serial Line CAN) is a simple ASCII-based protocol for interfacing with CAN devices. It’s a widely supported protocol, and VulCAN is definitely not the only CAN adapter out there that supports it. It’s not an “official” or standardized protocol, but a widely adopted convention.
Click here to see the latest VulCAN slcan firmware releases.
Here’s a quick list of supported commands:
O - Open channel
C - Close channel
Sn - Set bitrate. n=0-8, selecting from 10k/20k/50k/100k/125k/250k/500k/750k/1M bps (s0 = 10kbps, s8 = 1Mbps)
M0 - Set mode to normal mode (default)
M1 - Set mode to silent mode
A0 - Disable automatic retransmission
A1 - Enable automatic retransmission (default)
TIIIIIIIILDD… - Transmit data frame (Extended ID) [ID, length, data]
tIIILDD… - Transmit data frame (Standard ID) [ID, length, data]
RIIIIIIIIL - Transmit remote frame (Extended ID) [ID, length]
rIIIL - Transmit remote frame (Standard ID) [ID, length]
V - Returns firmware version and remote path as a string
On Linux, Windows, and MacOS, you can use python-can to interface with a VulCAN running slcan firmware.
On Linux and Windows, the open-source cangaroo tool can interface with slcan devices.
On Linux, you can use can-utils and slcand to map a native CAN interface to a slcan device.
candleLight
candleLight is an implementation of the SocketCAN protocol. While only compatible with Linux systems, it’s the most powerful and flexible way of adding CAN functionality to a system. When using a candleLight-compatible adapter, the device is automatically recognized as a virtual CAN network interface by the Linux kernel when plugged in — no slcand or anything needed!
Click here to see the latest VulCAN candleLight firmware releases.
See the python-can docs and can-utils for more information on usage. SocketCAN/candleLight is a great approach for high-performance embedded CAN systems, as well as interfacing with system-level languages like C/C++/Rust in real-time applications.
Specs for Nerds
We use a STM32F042C6 microprocessor.
CAN Transceiver is a TJA1051TK-3.
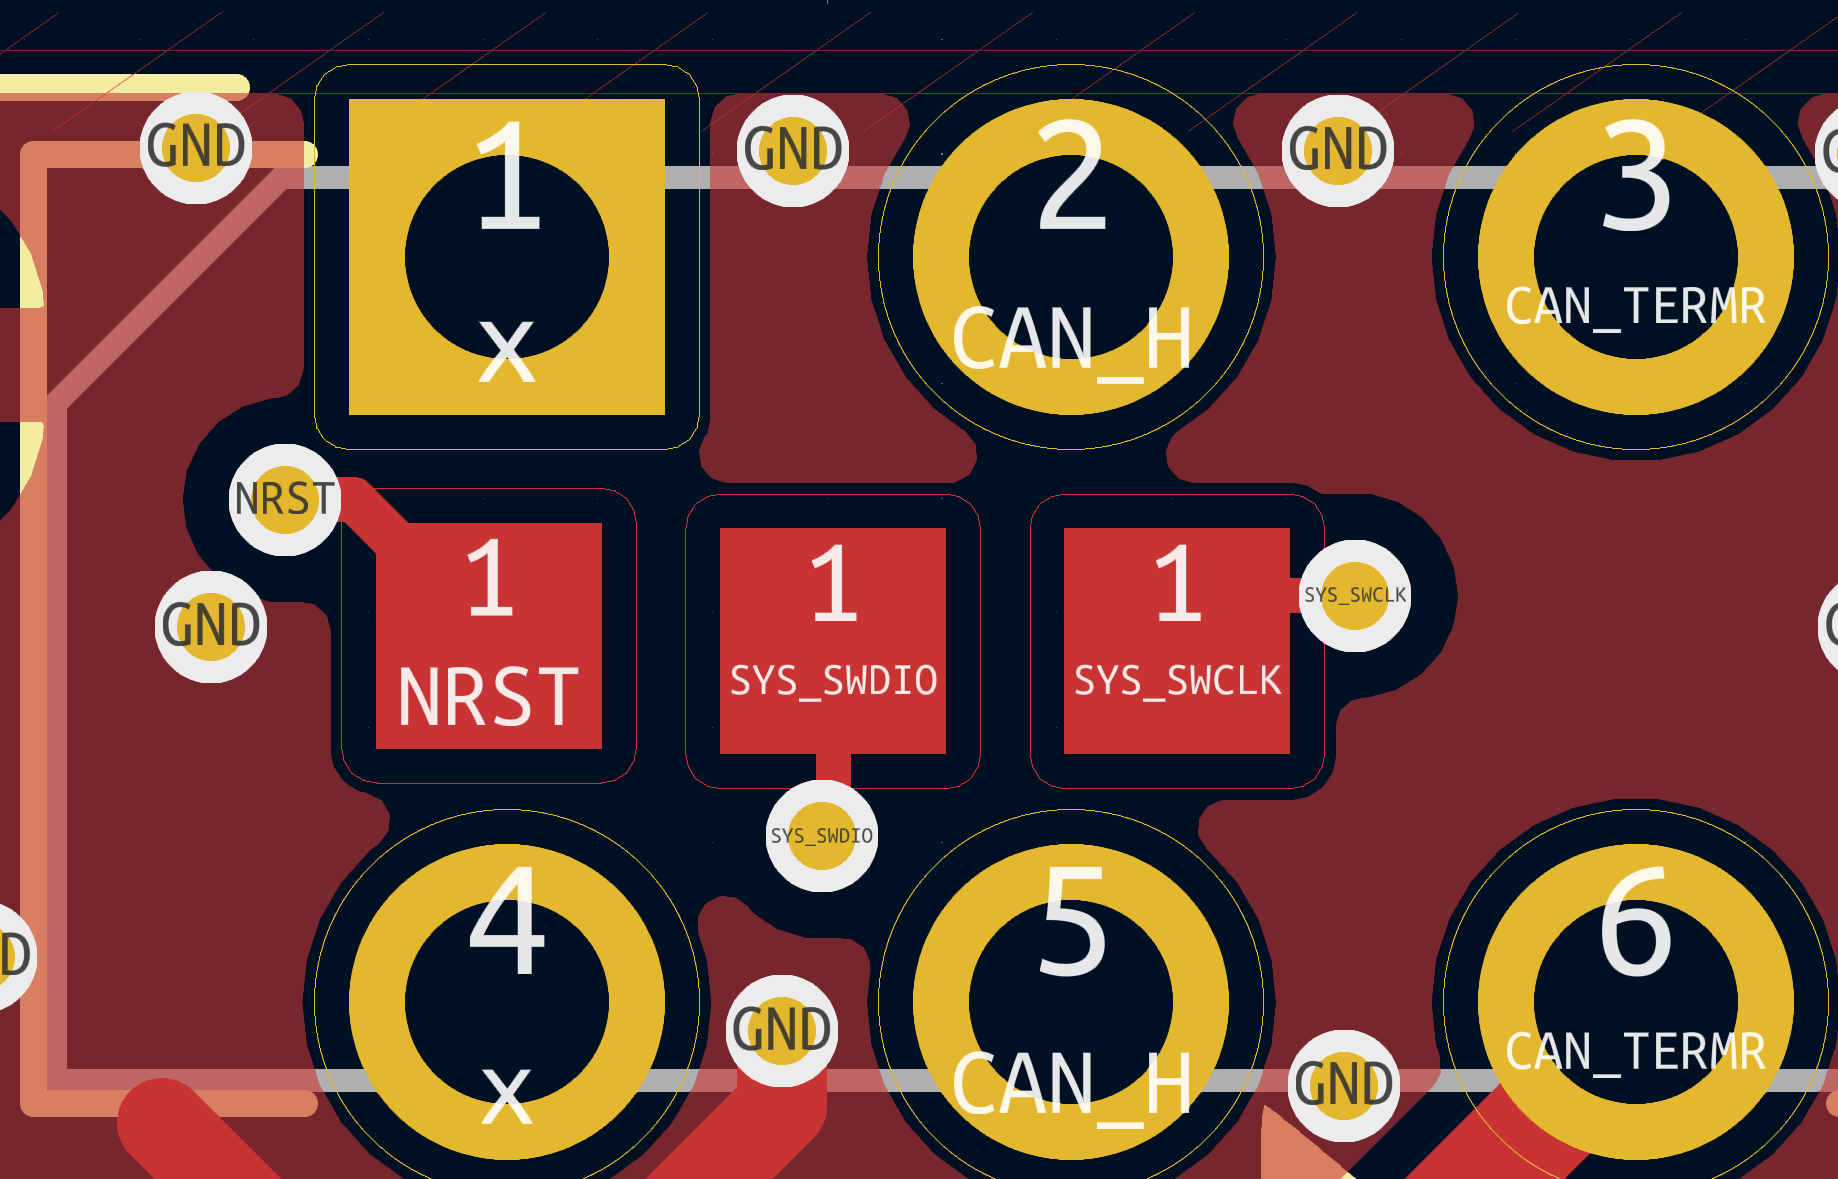
If you desolder the CAN termination switch, you’ll find SWD pads hidden underneath ;)
Thanks and Attributions
Massive thanks to Linklayer, HubertD, and normaldotcom for all their work on open-source CAN hardware and firmware. Specifically, without their work on slcan, candleLight, and cangaroo, VulCAN wouldn’t be here today.
VulCAN slcan firmware is forked from canable-fw, and candleLight firmware is forked from candleLight_fw.
Original inspiration for the hardware design comes from cantact-hw.